Install kernel 2.6 by using 'linux26' at the initial installation screen.

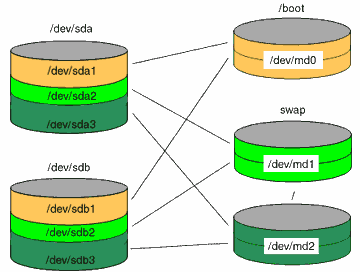
md-device mount boot partition-type
/dev/md0  /boot *    primary
/dev/md1  swap       primary
/dev/md2  /          primary
This generally illustrates how I am going to set this machine up. We will end up booting from the first partition on /dev/sdb (hd1,0), and the root file system will be read from /dev/md2. Both drives will be bootable. I think it is a good idea to have a /boot partition, and I have only tested this setup with one in place:
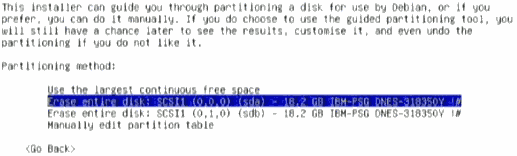
Step 1. Once you get to the parition manager, we start by choosing "Erase entire disk" on the first disk (sorry for the poor quality video captures, I hope you have a good monitor):
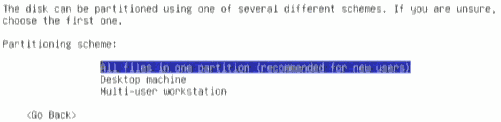
Step 2. You will next choose "All files in one partition". Don't be concerned if this is not the partitioning scheme you desire. We are later going to erase the disks and create our desired scheme. It is important that both disks are erased, then set up with "All files in one partition". This ensures the disks start out having identical properties:
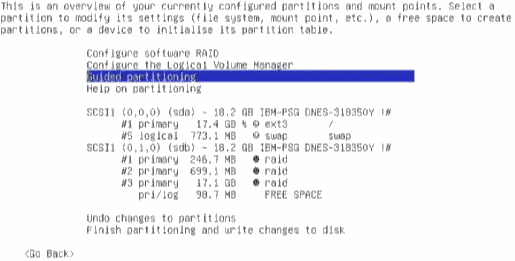
Step 3. Choose "Guided partitioning" to return to the menu that will allow you to erase the second disk. Repeat steps 1 and 2 for the second disk:
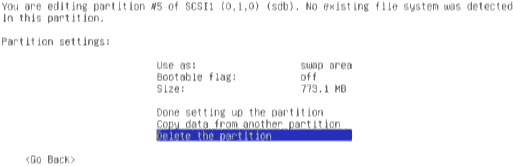
Step 4. This shows the disks have been configured in the same manner. Now we are going to remove all the existing partitions from both disks. Start with the last partition and work backwards to the first until both disks have nothing but empty space. I illustrate; first choose the last partition:
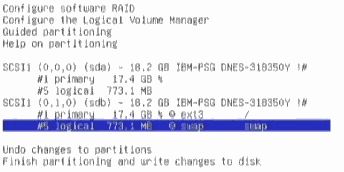
Step 5. Then from the next menu, delete the partition.
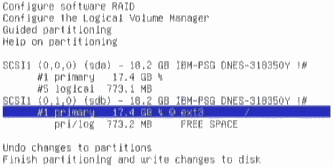
Step 6. Then select the next partition. Repeat steps 4 and 5 for all the partitions:
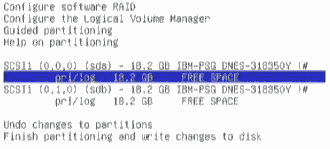
Step 7. Shows the result of deleting all the partitions. Now we are going to create our partitioning scheme from the empty space. Of course you need to determine in advance how you are going to partition your hard drive. You need to know not only what partitions you will create, but also the size they will be. On this test system, I am going to create a /boot partition of 250MB, a swap partition of 700MB, and a root partition that will fill nearly all the remaining space (and they will be in that order). Make sure your swap partition is larger than the amount of physical RAM you have installed (or intend on installing in the future) in your system. Start by selecting one of the free space areas on one of the drives:
Step 8. We are going to create a new partition, so obviously choose that:

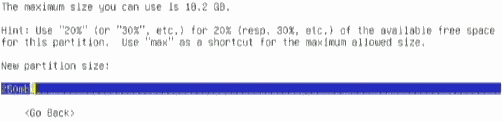
Step 9. The first partition on each drive will be 250MB of space that will hold the /boot partition, so backspace the size given, and enter the desired size, which in this case is 250mb:
Step 10. The first three partitions can be of type "Primary":
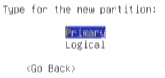
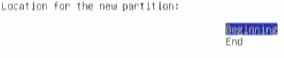
Step 11. We are working from the beginning to the end, so we choose "Beginning":
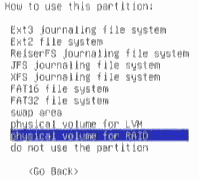
Step 12. We are going to change the "Use as:" setting that partman gave us. We want to use all the partitions on both drives as "physical volume for RAID":
Step 13. Here we choose "physical volume for RAID" for this partition:
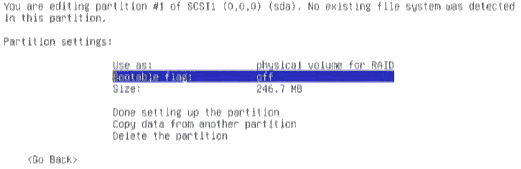
Step 14. A critical step. This will be the /boot partition. It is the first partition on the disk so we want it bootable. You need to change the Bootable flag to "on". This needs to be done for the first partition on both drives:
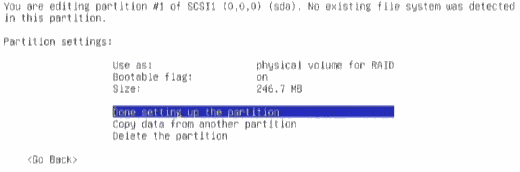
Step 15. Note the Bootable flag. We are done setting up this partition:
Step 16. Here I show we have once again selected the free space on this drive. This time we are going to allocate some space to our swap partition:
Step 17. Same as step 12 (select Use as:).
Step 18. Same as step 13. Also choose "physical volume for RAID" for this space. Actually, at the moment we choose this for all the partitions we are configuring. I am allocating 700mb of space for the swap partition, so when the dialog comes up, backspace and replace the value partman gives us with "700mb".
Step 19. You will follow the same procedure to allocate space for our root partition, but rather than allow all the remaining free space to go to to root partition, we leave a tiny bit to compensate for slight differences in hard drives. This is the last partition I am configuring on this disk, and as always partman wants to allocate the entire remaining space, which in my case is 17.2 GB:
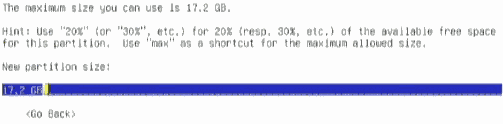
Step 20. So here I backspace and change "17.2" to "17.15":

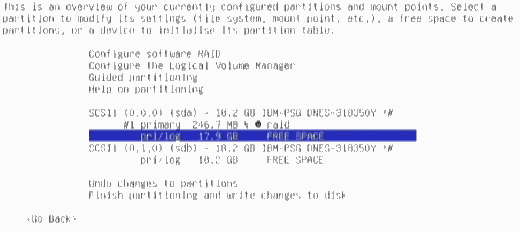
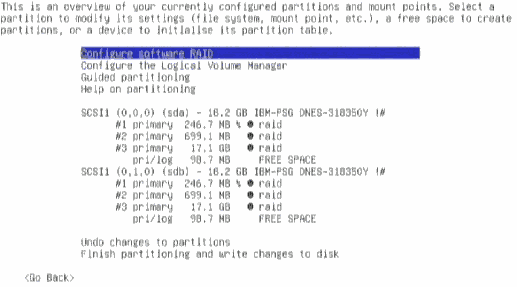
Step 21. Precisely repeat the procedure for the second drive. This is what the finished product should look at this point. Note how the first partition on each drive is bootable, all the partitions are RAID, the corresponding partitions are equal and there is a little slack space on the end of the drive. The next step is to "Configure software RAID":
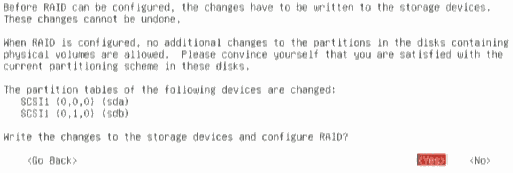
Step 22. This is a warning. You are going to destroy data at this point. You must answer "Yes" if you wish to continue on:
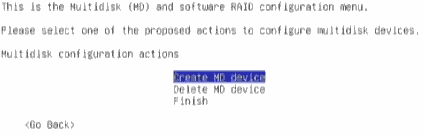
Step 23. We are going to create md0, md1, and md2. You must completely finish creating one before moving on to create another. Choose "Create MD device":
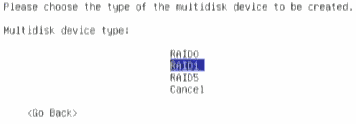
Step 24. Choose "RAID1":
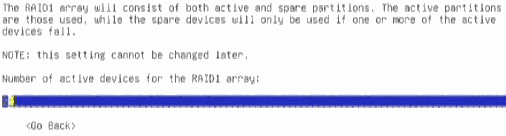
Step 25. Accept the default of 2 active devices:
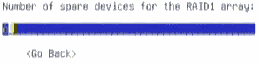
Step 26. Accept the default of 0 spare devices:
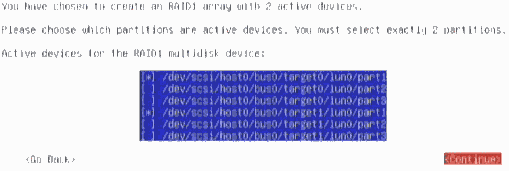
Step 27. Here is one part that is likely not obvious to someone not familiar with RAID1. Use the space bar to make your selection of two devices. The two devices are the two matching RAID partitions that we created. Partition 1 on target 0 (sda1), and partition 1 on target 1 (sdb1):
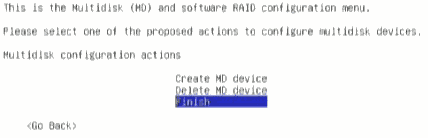
Step 28. We need to finish creation of md0 before we move on to md1, so choose "Finish":
Step 29. Repeat steps 21 through 28. This time there will be fewer choices. Here we show selecting partition 2 from both devices:
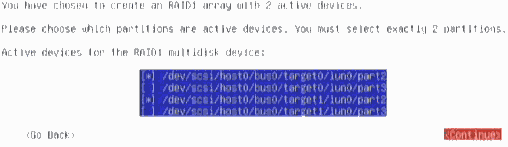
Step 30. Round and round for the third time, this time selecting the two remaining entries representing the third partitions:

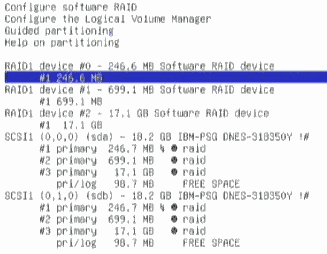
Step 31. Your setup should be similar to this. We now need to change how the partitions on these three Software RAID devices are used. Here I select the first one which we configure as our /boot partition:
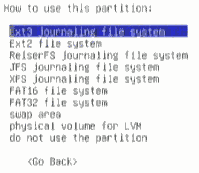
Step 32. Of course select "Use as":
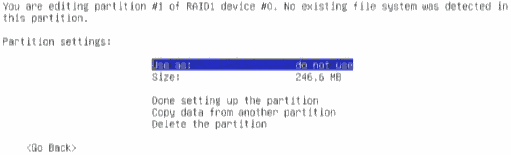
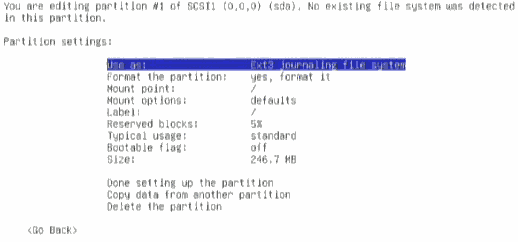
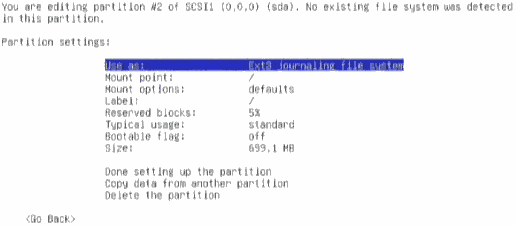
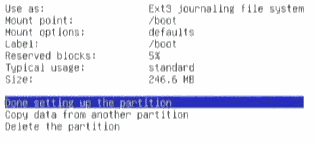
Step 33. We are using Ext3 journaling file system for our /boot partition:
Step 34. This will be /boot, so change the mount point to reflect our choice. Once we choose "Done ..." we have finished setting up the first of three:
Step 35. Repeat the procedure for the swap partition (use as swap area), and the root partition (use as Ext3 journaling file system, the mount point is obviously /). Once you have accomplished configuring the remaining partitions, the finished product should bear a lot of resemblance to this. If it does not, then I have not done a good job of explaining how to accomplish this, and I can't hope to guess how your system will function. If configuring EIDE, the RAID devices may be listed last instead of first. You can choose "Finish ..." if everything looks good:
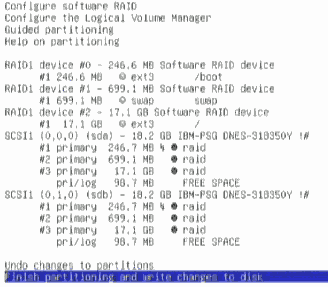
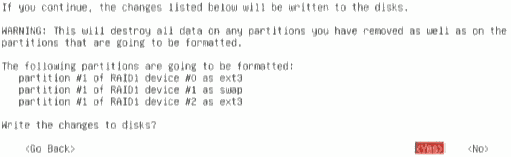
Step 36. You must choose to write the changes. You might as well, we trashed any data on these disks a while ago:
If you are using the 4.0r1 CD, there may be an issue with partman. This may be related to not using clean disks. If you did not start with clean disks, consider using a DBAN boot disk to wipe both drives before beginning the installation (use the 'Quick erase' method to speed things up). Once you are finished writing the changes and have moved on to the next prompt (Configure Time Zone), partman may have forgotten how we wanted to use the RAID1 partitions (swap, ext3) and how the partitions will be mapped (swap, /boot, /). It would be a good idea to make sure all the md devices were created. You can open another terminal session by using [Alt-F2] (use [Alt-F1] to toggle back to the installer). Run 'df' and verify that md devices (shown in the form /dev/md/0, /dev/md/2 etc.) are in the list. The swap partition (in our case /dev/md/1) will not be on the list (this is normal); you can use 'free' to see that a swap partition does in fact exist. If at this point you are missing an md device, please choose <Go Back> (this will bring up the expert menu), then choose "Partition disks". One by one, select the RAID1 partitions and again set the "Use as:" and mapping for each partition. Then "Finish ..." once again. Continue the installation by choosing "Configure the time zone" from the expert menu (if you are returned to the expert menu).
At his point the disks will be synchronizing. It is best to let this finish before moving on. To monitor the progress press [Alt]+F2 to open the second console. Then enter "cat /proc/mdstat" to monitor the progress. You will want both partitions Up, [UU] for each md device. When that is finished, you can return to the Debian installer by using [Alt]+F1. You could alternately simply wait for the HDD LED to stop flashing. Figure about 7 minutes for a 6GB hard drive and an hour for 160GB.
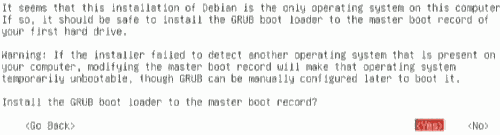
Step 37. At some point, you be asked to install GRUB, which of course you want to do:
If one of the programs you install is 'uswsusp', You will receive the prompt "The swap partition that was found in uswsusp's configuration file is not active. .... Continue without a valid swap partition?". I answered <Yes>. Once the system was up, I did 'cat /etc/uswsusp.conf' and did see that the correct partition was used (resume device = /dev/md1). If you chose <Yes> and are returned to the partitioner at this point, this is a sign that your RAID settings have not been remembered. Once again, you may need to reconfigure the "Use as:" and mappings for each RAID partition.
Step 38. Notice when the machine reboots that the md module is loaded:
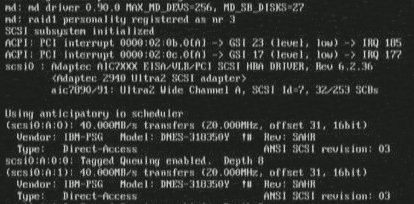
The really nice thing about configuring RAID the way we did is that all the work of getting the modules to load on boot up is done for us. The mdadm (multi-disk administrator) monitor program is also automatically started so we are warned via email if a disk failure occurs. The downside of this 'ease of use' is you have the impression everything is working (and to some extent it is), so that is all we need to do. WRONG!
Continue on with the Debian installer until you get to the point you can log in as root (or if using a GUI, log in as regular user, then open a terminal and su to root). Log in as root, then: