This document is an addendum to
http://verchick.com/mecham/public_html/spam/spamfilter20090215.html.
If your remote clients retrieve mail from a POP3 or IMAP server, you can offer them
the ability to use the spamfilter as their outgoing SMTP server provided they
authenticate via SASL. Also, in a separate section at the bottom of this document I explain
how to set up Postfix as the SASL client so you can have the spamfilter authenticate
with your ISP's mail server in order to use your ISP's SMTP server as a smart host
(relayhost).
You need to save this document to your computer then edit this page and do a search and
replace of certain items in order to customize it for your server.
Open the saved document in WordPad, a plain text HTML editor or other similar text editor
that will not modify the HTML code and read the instructions at the top of the document.
The instructions will point you to few items that should be changed.
If you search the web for Postfix SASL HOWTOs you may see a lot of
different ways to do it. This can be very confusing for someone not familiar
with what is going on here. Like most HOWTOs this document only shows you one way
out of many to configure SASL, but it will also attempt to provide a little insight
as to why it can be so confusing. This document assumes there is no local mail
stored on this server. The server is acting as a relay only mail server.
SASL is essentially the mechanism that allows
a mail client to send a user_name/password pair to the server. Once the user
is SASL authenticated, they may use the server to relay mail to domains other than the
domains the server is responsible for by means of the Postfix restriction
permit_sasl_authenticated. Here I describe the relay control aspect if it:
This is the default relay control mechanism:

smtpd_recipient_restrictions =
   permit_mynetworks
   reject_unauth_destination

And hopefully this generally describes how it works:

       SMTP session
             |
             V
(smtpd_client_restrictions)
             V
(smtpd_helo_restrictions)
             V
(smtpd_sender_restrictions)
             V
smtpd_recipient_restrictions

  permit_mynetworks
   |   \
   |    DUNNO
   |     \
   |      V
   |   reject_unauth_destination------REJECT->
   |           \
PERMIT      DUNNO
   |             \
   V              V
(smtpd_data_restrictions)

This says: (permit_mynetworks) if the client is in $mynetworks, skip any
remaining tests in this restriction stage (smtpd_recipient_restrictions)
and go on to the next restriction stage (smtpd_data_restrictions).

If the client is not in $mynetworks, let the next test
(reject_unauth_destination) decide what to do with this
communication session (in other words: pretend nothing
happened and continue on).

So, provided the client is not in $mynetworks, proceed to
reject_unauth_destination, which says:
If the message IS addressed to one of the domains I am responsible
for (domains listed in their proper address class),
then let the next test in this restriction stage decide what to do
with the session. As shown, there is no next test in this stage, so
processing continues on to the next stage (smtpd_data_restrictions).

If the message IS NOT addressed to one of my domains, then reject it.
The client will see 'relay access denied'.

Hopefully this is at least a conceptually accurate description of the
relay control mechanism.

Notice how
permit_* evaluates to PERMIT (OK) or DUNNO
and
reject_* evaluates to REJECT or DUNNO

In order to allow clients that have authenticated via SASL to relay mail
to domains other than those we are responsible for, we add permit_sasl_authenticated
before reject_unauth_destination:

smtpd_recipient_restrictions =
   permit_mynetworks
   permit_sasl_authenticated
   reject_unauth_destination
SASL is confusing because there are so many different ways to configure it.
Basically the user_name/password
pairs need to be stored in a table somewhere and Postfix needs to converse with some another
program to query that table. The best source of information on this is the Postfix SASL_README
http://www.postfix.org/SASL_README.html.
This document states "Currently the Postfix SMTP server supports the Cyrus SASL and Dovecot SASL implementations.".
With Dovecot, one would have Dovecot IMAP/POP3 installed, and within Dovecot one would have
configured a password database and a password scheme, and then one would configure Dovecot
to listen on a Unix socket. Postfix would communicate with Dovecot via this socket.
With Cyrus SASL, you can run the saslauthd daemon, which can be configured to use these methods
of user_name/password storage/retrieval:
# saslauthd Available options in this Debian package:
# getpwent  -- use the getpwent() library function
# kerberos5 -- use Kerberos 5
# pam       -- use PAM
# rimap     -- use a remote IMAP server
# shadow    -- use the local shadow password file
# sasldb    -- use the local sasldb database file
# ldap      -- use LDAP (configuration is in /etc/saslauthd.conf)
or
you can use the auxprop plugin which allows one to connect to SQL or sasldb,
or you can use the authdaemond daemon that comes with Courier IMAP/POP3.
In addition to all the complexity of putting together a method (or methods) of storing
the user_name/password or shared secret, your client will use a mechanism such
as PLAIN or LOGIN to communicate the user_name/password, or will use
a mechanism such as CRAM-MD5 or DIGEST-MD5 to authenticate via a shared secret. How
your clients are configured to authenticate dictates which mechanism or mechanisms need to be
configured on the server. I could also say: how the server is configured dictates
how the clients need to be configured. Here is a good page to read completely:
http://www.sendmail.org/~ca/email/cyrus2/components.html.
To add to the complexity, on Debian, Postfix runs chrooted which means we have
to provide ways for it to communicate with the databases without breaking out of the chroot jail.
My point here is that you will often find Debian Postfix SASL Howtos on the Internet that say "This is
how to do it!" but only explain one configuration scenario, leaving those unfamiliar with
the complexity of SASL to think that there is only one way to do it.
To further add to the complexity,
in order to encrypt traffic to prevent password sniffing, TLS is often used in
conjunction with SASL, and those that are attempting to configure
SASL for the first time may make the mistake of attempting to set up
TLS simultaneously. Don't do that.
Having explained that there are numerous ways to configure SASL, as mentioned earlier, this
HowTo (like many others) is only going to illustrate one possible way to do it.
In this setup, we will:
- Use the Cyrus saslauthd daemon
- Create Unix accounts and use PAM for user_name/password storage
- Configure SASL on ports 465 (smtps) and 587 (submission)
- Allow PLAIN or LOGIN mechanisms
The users of the Unix accounts we create will not have the ability
to log into the spamfilter itself. No home directories will be created.
We will assume that the host name of the spamfilter is sfa.example.com.
Open PuTTY, log into the spamfilter and create a Unix account
we will use for testing (remember the password you use here):
useradd -s /bin/false test

passwd test
|
When a user is added or removed, /etc/passwd changes. Postfix may complain
that "/var/spool/postfix/etc/passwd and /etc/passwd differ". You can update
the passwd file in the chroot jail by running:
or by running /etc/init.d/postfix restart. A reboot would also
update the file. However, since Postfix will be calling saslauthd
for SASL authentication, it is not required to
provide Postfix with a new copy of /etc/passwd after each change.
Add needed programs:
apt-get install sasl2-bin libsasl2-2 libsasl2-modules
|
vi /etc/default/saslauthd
|
And change the setting of these three items to the values shown:
START=yes

MECHANISMS="pam"

OPTIONS="-c -m /var/spool/postfix/var/run/saslauthd"
|
Since Postfix runs chrooted on Debian, we need to perform two tweaks so Postfix can converse with saslauthd's Unix socket:
dpkg-statoverride --add root sasl 710 /var/spool/postfix/var/run/saslauthd

adduser postfix sasl
|
Now we tell Postfix what password check method and mechanism we have configured:
vi /etc/postfix/sasl/smtpd.conf
|
and insert these two lines:
pwcheck_method: saslauthd

mech_list: PLAIN LOGIN
|
Make a backup of main.cf and master.cf, then make a few changes to Postfix configuration. I turn off SASL for port 25. I want
to restrict SASL to ports 587 (submission) and 465 (smtps):
cp /etc/postfix/main.cf /etc/postfix/main.cf-prior-to-sasl

cp /etc/postfix/master.cf /etc/postfix/master.cf-prior-to-sasl

postconf -e "smtpd_sasl_security_options = noanonymous"

postconf -e "broken_sasl_auth_clients = yes"

postconf -e "smtpd_sasl_auth_enable = no"
|
Now configure main.cf to enable relay for SASL auth clients in Postfix.
vi /etc/postfix/main.cf
and add or change the line shown below. If main.cf does not contain smtpd_recipient_restrictions,
then add the entire section:
smtpd_recipient_restrictions =
        permit_sasl_authenticated,
        permit_mynetworks,
        reject_unauth_destination
Now vi /etc/postfix/master.cf and uncomment as illustrated:
submission inet n       -       -       -       -       smtpd
#  -o smtpd_tls_security_level=encrypt
#  -o smtpd_tls_security_level=may
  -o smtpd_sasl_auth_enable=yes
  -o smtpd_client_restrictions=permit_sasl_authenticated,reject
#  -o milter_macro_daemon_name=ORIGINATING
smtps     inet  n       -       -       -       -       smtpd
#  -o smtpd_tls_wrappermode=yes
  -o smtpd_sasl_auth_enable=yes
  -o smtpd_client_restrictions=permit_sasl_authenticated,reject
#  -o milter_macro_daemon_name=ORIGINATING
Now restart Postfix and start up saslauthd:
/etc/init.d/postfix restart

/etc/init.d/saslauthd start
|
We have to allow port 465 and 587 traffic into our server now, so change the firewall
settings. DO NOT USE AS IS, CHANGE NETWORK ADDRESS FIRST. The workstation
you use to SSH into the spamfilter needs to be in the network provided here:
iptables -F

iptables -N FIREWALL

iptables -F FIREWALL

iptables -A INPUT -j FIREWALL

iptables -A FORWARD -j FIREWALL

iptables -A FIREWALL -p tcp -m tcp --dport 25 --syn -j ACCEPT

iptables -A FIREWALL -p tcp -m tcp -s 222.222.222.222/24 --dport 22 --syn -j ACCEPT

iptables -A FIREWALL -p tcp -m tcp -s 222.222.222.222/24 --dport 80 --syn -j ACCEPT

iptables -A FIREWALL -i lo -j ACCEPT

iptables -A FIREWALL -p udp -m udp --sport 53 -j ACCEPT

iptables -A FIREWALL -p tcp -m tcp --sport 53 -j ACCEPT

iptables -A FIREWALL -p udp -m udp --dport 123 -j ACCEPT

iptables -A FIREWALL -p udp -m udp --sport 123 -j ACCEPT

iptables -A FIREWALL -p tcp -m tcp --dport 465 -j ACCEPT

iptables -A FIREWALL -p tcp -m tcp --dport 587 -j ACCEPT

iptables -A FIREWALL -p udp -m udp --sport 6277 -j ACCEPT

iptables -A FIREWALL -p udp -m udp --sport 24441 -j ACCEPT

iptables -A FIREWALL -p icmp --icmp-type destination-unreachable -j ACCEPT

iptables -A FIREWALL -p icmp --icmp-type source-quench -j ACCEPT

iptables -A FIREWALL -p icmp --icmp-type time-exceeded -j ACCEPT

iptables -A FIREWALL -p icmp --icmp-type parameter-problem -j ACCEPT

iptables -A FIREWALL -p icmp --icmp-type echo-reply -j ACCEPT

iptables -A FIREWALL -p icmp --icmp-type echo-request -j ACCEPT

iptables -A FIREWALL -p tcp -m tcp --syn -j REJECT

iptables -A FIREWALL -p udp -m udp -j REJECT

iptables -A FIREWALL -p icmp -j DROP

iptables-save > /etc/firewall-rules

iptables-restore < /etc/firewall-rules
|
Now I am going to test by taking a currently working account configured in Outlook Express
and reconfiguring it to use the spamfilter as the Outgoing mail (SMTP) server. You will
want to use the hostname of your server as the Outgoing mail (SMTP) server and not the IP address.
Make sure that you are able to resolve the hostname. Note that Outlook settings are similar to
Outlook Express, but not precisely identical. In Outlook Express, I navigated to:
Tools> Accounts> Properties> Servers and set the Outgoing mail (SMTP) to our spamfilter. I have not made
any other change on this page.
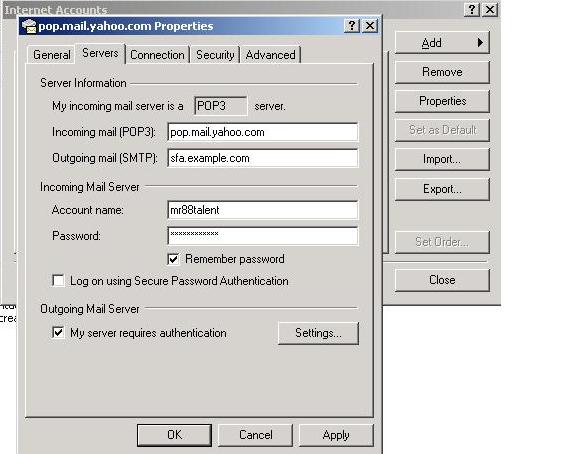
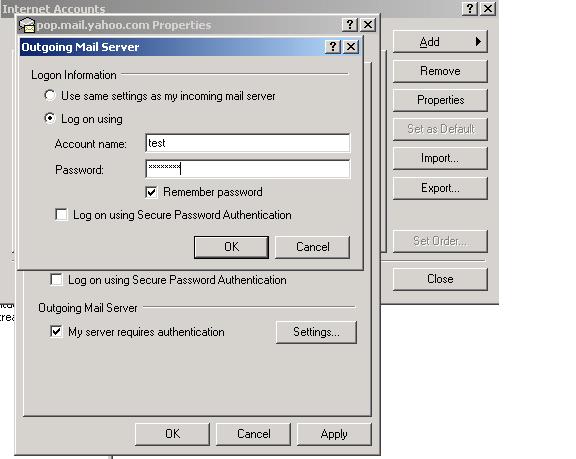
Now since The Outgoing Mail Server has changed, we need to change the Settings for it, so under
"Outgoing Mail Server", "My server requires authentication" must be checked before we can change the Settings.
Here I enter the user name an password of the Unix Account we created on the system.
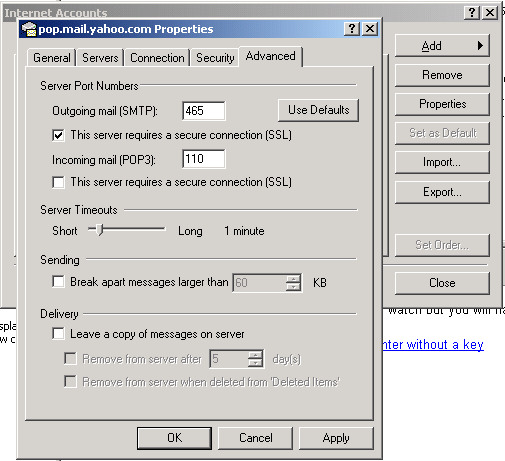
On the Advanced tab we now change to port 465 for Outgoing mail (SMTP), and since I turned off TLS, I also temporarily unchecked
"This server requires a secure connection (SSL)"
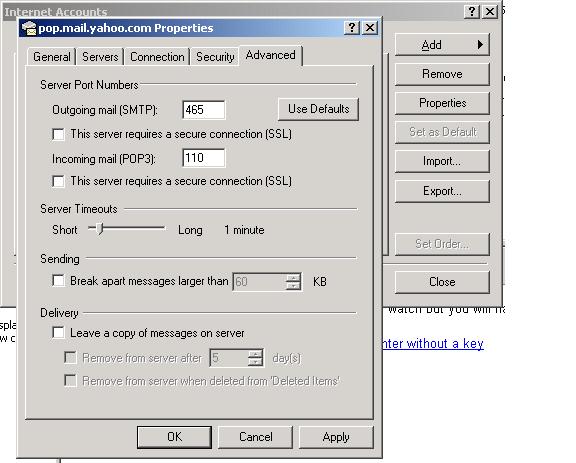
Save the settings of course. We are going to create a message and send it through the spamfilter.
On the spamfilter we will look to see if SASL worked as the message was submitted:
tail -f /var/log/mail.log | egrep '(sasl|SASL)'
|
Create a new message and send it to yourself. Here I show success:
May 2 09:40:32 sfa postfix/smtpd[17535]: 7E6473DF8A: client=unknown[192.168.1.41], sasl_method=LOGIN, sasl_username=test
|
And here is what a bad password or user name might look like:
May 2 09:45:03 sfa postfix/smtpd[17842]: warning: unknown[192.168.1.41]: SASL LOGIN authentication failed: authentication failure
|
Here someone forgot to start saslauthd:
May  2 09:46:31 sfa postfix/smtpd[17842]: warning: SASL authentication failure: cannot connect to saslauthd server: No such file or directory

May  2 09:46:31 sfa postfix/smtpd[17842]: warning: unknown[192.168.1.41]: SASL LOGIN authentication failed: generic failure
|
Note that we have configured the saslauthd daemon to cache user_name/password pairs, so if you
change a password for a user, saslauthd will accept both the old and new password
until you restart saslauthd. You should perform the same test using port 587 as the outgoing
port. It should work exactly the same because so far we have configured it exactly the same.
When finished testing, and assuming you are using Outlook, Outlook Express or
Windows Mail (in other words, a Microsoft mail client), set the port back to port 465.
If you are connecting to the spamfilter from a remote location, it's likely you will
be doing so from dynamic address space. This means that your messages may get
an increased spam score. We need to reconfigure amavisd-new and Postfix to allow remote
users to send messages that might be a little more spammy than normal. This is accomplished
by using amavisd-new Policy Banks. Policy banks allow particular clients (our SASL authenticated
clients for example) to override chosen settings in amavisd.conf.
vi /etc/amavis/amavisd.conf
|
and change this from the default (as shown):
$inet_socket_port = [10024, 10028];
|
and then add these entries:
$interface_policy{'10028'} = 'SASLAUTH';

$policy_bank{'SASLAUTH'} = {  # authenticated clients
  originating => 1, # declare that mail was submitted by our smtp client
  spam_admin_maps  => ["postmaster\@$mydomain"], # alert of internal spam
  final_spam_destiny => D_BOUNCE, # so the internal sender knows their spammy message
                                  # did not get delivered
  spam_tag2_level_maps => [12], # set tag2 level higher than normal
  spam_kill_level_maps => [12], # set kill level higher than normal
  spam_dsn_cutoff_level_maps => [9999],
  spam_dsn_cutoff_level_bysender_maps => [9999],
  banned_filename_maps => [
    new_RE(
    # block double extensions in names:
      qr'\.[^./]*\.(exe|vbs|pif|scr|bat|cmd|com|cpl|dll)\.?$'i,
    # allow any name or type (except viruses) within an archive:
      [ qr'^\.(Z|gz|bz2|rpm|cpio|tar|zip|rar|arc|arj|zoo|7z)$' => 0],
    # blocks MS executable file(1) types, unless allowed above:
      qr'^\.(exe-ms)$',
    ),
  ],
};
then reload amavisd-new:
Now we need to redirect authenticated traffic to port 10028 instead of 10024 so
vi /etc/postfix/main.cf and disable content
filter by commenting out this line:
#content_filter = smtp-amavis:[127.0.0.1]:10024
|
then vi /etc/postfix/master.cf and make
the additions shown. The changes mean that messages sent by unauthenticated clients will be
transported to amavisd-new on port 10024 just as they were before, and authenticated
clients will instead use the amavisd-new policy bank listening on port 10028.
Note that the spaces surrounding the "=" sign must be removed when the settings are placed in master.cf.
Also note that in Postfix, if something is commented out, the hash mark # must be the
first character on the line:
smtp      inet  n       -       -       -       -       smtpd
  -o content_filter=smtp-amavis:[127.0.0.1]:10024
submission inet n       -       -       -       -       smtpd
#  -o smtpd_tls_security_level=encrypt
  -o content_filter=smtp-amavis:[127.0.0.1]:10028
  -o smtpd_sasl_auth_enable=yes
  -o smtpd_client_restrictions=permit_sasl_authenticated,reject
#  -o milter_macro_daemon_name=ORIGINATING
smtps     inet  n       -       -       -       -       smtpd
#  -o smtpd_tls_wrappermode=yes
  -o content_filter=smtp-amavis:[127.0.0.1]:10028
  -o smtpd_sasl_auth_enable=yes
  -o smtpd_client_restrictions=permit_sasl_authenticated,reject
#  -o milter_macro_daemon_name=ORIGINATING
then restart Postfix:
/etc/init.d/postfix restart
|
Test the system by sending another message through to insure we have not broken something when
we made the changes.
Ok, so SASL is configured at this point, so we move on to TLS.
TLS version 1.0 is a minor modification to the SSL 3.0 protocol and is sometimes referred to as SSL 3.1.
Like SSL, certificates are used in the encryption process. I am going to assume you are not going
to purchase a certificate from a well known certificate authority but instead are going to
to use a self signed certificate. This should be sufficient
enough to allow mail clients (MUAs) to encrypt traffic. The only problem is that the Certificate
Authority you create will not be a trusted Certificate Authority. You will have to manually
install the CA Certificate in each client or your mail client will complain. This HOWTO assumes that you
have not already created certificates for your spamfilter server and handed them out to clients.
Make sure openssl is installed:
Every client that connects to this server will need to be able to resolve the
hostname of the server. During testing you either need an entry in your hosts file
or an A record on your DNS server so we can properly resolve the hostname.
We are going to be our own Certificate Authority and sign our own certificates.
These commands are dependent on /etc/ssl/openssl.cnf as supplied by Debian.
We start by making a small change to /etc/ssl/openssl.cnf. We make it
so by default our certificates are good for 10 years instead of 1:
sed -i 's/= 365\t/= 3653\t/' /etc/ssl/openssl.cnf

grep 365 /etc/ssl/openssl.cnf
We will set up a common place to put our certificates:
cd /root

mkdir CA

cd CA

mkdir demoCA

cd demoCA

mkdir newcerts

mkdir private

echo '01' > serial

touch index.txt

cd ..
Create a Root Certificate:
openssl req -new -x509 -extensions v3_ca -keyout demoCA/private/cakey.pem -out cacert.pem -days 7320
Enter a passphrase when prompted. You will need this passphrase in the future.
What I mean is: make it unique and don't ever loose it.
You will be asked questions. Sample answers follow. Be sure to use the full
name for your state or province name and the Common Name should be something
that describes you as an authority (like Widgits Inc. RootCA):
Country Name US

State or Province Name Utah

Locality Name Salt Lake City

Organisation Name Widgits Inc.

Organisational Unit Name Spam Filter

Common Name (eg, YOUR name) Widgits Inc. RootCA

Email Address postmaster@example.com
This process produces two files as output: a private key in demoCA/private/cakey.pem and
a root CA certificate in cacert.pem. Any and all key files we produce will need to be protected
from unauthorized persons reading them, and must not be lost for the next 20 years. Also
realize that the CA you created can sign any number of certificates (until it
expires 20 years from now) so you only need to (or want to) create the CA once. We will copy
our cert and our key to something more descriptive:
cp -i demoCA/private/cakey.pem demoCA/private/cakey.example.com.pem

chmod 600 demoCA/private/*

cp -i cacert.pem cacert.example.com.pem

cp -i cacert.pem cacert.example.com.crt
We copy the root CA certificate to /usr/share/ca-certificates/self:
mkdir /usr/share/ca-certificates/self

cp -i cacert.example.com.crt /usr/share/ca-certificates/self/
Now, run dpkg-reconfigure ca-certificates, answer yes to
"Trust new certificates from certificate authorities?" and then scroll down to
self/cacert.example.com.crt, use the spacebar to select it, Tab to Ok,
and press Enter to finish the job. This will create a sym-link to our CA certificate in /etc/ssl/certs:
dpkg-reconfigure ca-certificates
The cacert.example.com.pem and cacert.example.com.crt are copies of our certificate and
are the files that can be distributed and installed on the client's machines. Windows clients
would use the .crt file. On my Windows 2000 system, double clicking this file would install it
in Internet Explorer (which is exactly what want). Just in case you are not familiar, in IE6 it's
Tools->Internet Options->Content->Certificates->Trusted Root Certification Authorities.
Outlook and Outlook Express use the same certificate store as Internet Explorer.
In Mozilla Thunderbird it's Tools->Options->Advanced->Certificates->View Certificates->Authorities->Import.
If you go through this process more than once while testing, don't install duplicate certificates.
Delete any old 'test' certificate you previously installed before adding your new one that replaces it.
In my old version of The Bat! I add a new contact in the "Trusted Root CA" section of the address
book and import the certificate from there. I suggest using WinSCP to transfer the
/root/CA/cacert.example.com.com.crt certificate to your machine.
I think the worst part of getting TLS set up is getting the CA certificates installed on the clients.
Sometimes it's worth it to buy a certificate from a well known commercial CA that is already in the
Trusted Root Certification Authorities store.
OK, we are a certificate authority. We have the ability to sign our own certificates.
We are now going to create a request for a certificate from the CA (which is us - but
could be a commercial CA if you like).
Each SASL/TLS client that connects to us will use the hostname of this machine to connect to us.
The Postfix Secure SMTP server will be sfa.example.com, so the Common Name MUST BE our
FQDN hostname when we create the request. The Organization name needs to be the same as the one
in the CA cert.
Do not enter your email address, challenge password or an optional company name
when generating the CSR:
openssl req -new -nodes -out req.pem
Country Name US

State or Province Name Utah

Locality Name Salt Lake City

Organisation Name Widgits Inc.

Organisational Unit Name Spam Filter

Common Name (eg, YOUR name) sfa.example.com

Email Address
This process produces two files as output, a private key in privkey.pem and a certificate signing
request in req.pem. These files should be kept. The private key is necessary for SSL
encryption. We will make backup copies of these files with more descriptive names:
cp -i privkey.pem privkey.sfa.example.com.pem

chmod 600 privkey.*

cp -i req.pem req.sfa.example.com.pem
Sign the Certificate (you will be asked for the pass phrase):
openssl ca -out cert.pem -cert cacert.pem -infiles req.pem
This process updates the CA database and produces two files as output: a certificate in cert.pem and
a copy of the certificate in demoCA/newcerts/ named xx.pem, where xx is the serial number. We will
copy the cert to a more descriptive name. The certificate has both the encoded version and
a human-readable version in the same file. We want to strip off the human-readable portion as follows:
mv -i cert.pem temp.cert.sfa.example.com.pem

openssl x509 -in temp.cert.sfa.example.com.pem -out cert.pem

cp -i cert.pem cert.sfa.example.com.pem

chmod -R 600 /root/CA
After those steps, you have two installable components (and some more descriptive backup copies):
A private key in privkey.pem (with a copy in privkey.sfa.example.com.pem)
A certificate in cert.pem (with a copy in cert.sfa.example.com.pem)
Move the certificate and key:
cd /root/CA/

cp cert.sfa.example.com.pem /etc/ssl/certs/

cp privkey.sfa.example.com.pem /etc/ssl/private/

chmod 0600 /etc/ssl/private/privkey.sfa.example.com.pem
Tell Postfix where to find the certificates (and set a couple
other TLS parameters). We also make a backup of main.cf before we modify it for the first time:
cp -i /etc/postfix/main.cf /etc/postfix/main.cf-29jul2010


postconf -e "smtpd_tls_cert_file = /etc/ssl/certs/cert.sfa.example.com.pem"

postconf -e "smtpd_tls_key_file = /etc/ssl/private/privkey.sfa.example.com.pem"

postconf -e "smtpd_tls_CAfile = /etc/ssl/certs/cacert.example.com.pem"

postconf -e "smtpd_tls_received_header = yes"

postconf -e "smtpd_tls_session_cache_database = btree:${data_directory}/smtpd_scache"

postfix reload
Running some of these commands again will result in overwriting keys and certificates.
That may not be good. Some files will necessarily be overwritten if additional certificates
are requested, signed and created. That is expected, and is the reason
we make host-specific copies of everything as we go along.
Just be careful not to overwrite any host-specific files we have created. And remember,
only one Root Certificate Authority needs creation.
Make a backup of the session, both on and off the system
(transfer the directory via WinSCP).
cp -r /root/CA /root/CA-29jul2010
If you have not already done so, connect to your spamfilter using WinSCP and
copy /root/CA/cacert.example.com.crt
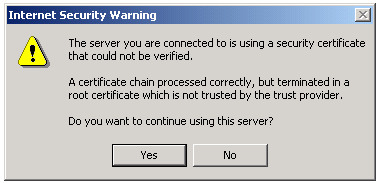
to your Windows machine. This is the certificate that can and should be installed on each client
that wants to use TLS. If you are using a Windows email client (Outlook, Outlook Express, Windows Mail)
then (as noted before) simply double clicking on the file, choosing "Install Certificate" and answering the
remaining prompts correctly will install this certificate in Internet Explorer and will allow these
clients to recognize the spamfilter as a trusted certificate authority, preventing
this type of error message:
Other mail clients will use other methods of importing the certificate.
In Thunderbird for example, it might be:
Tools->Options->Advanced->Certificates->View Certificates->Authorities->Import.
In order to enable TLS on ports 465 (smtps) and 587 (submission), once again make changes to master.cf as illustrated below:
smtp      inet  n       -       -       -       -       smtpd
  -o content_filter=smtp-amavis:[127.0.0.1]:10024
submission inet n       -       -       -       -       smtpd
  -o smtpd_tls_security_level=encrypt
  -o content_filter=smtp-amavis:[127.0.0.1]:10028
  -o smtpd_sasl_auth_enable=yes
  -o smtpd_client_restrictions=permit_sasl_authenticated,reject
#  -o milter_macro_daemon_name=ORIGINATING
smtps     inet  n       -       -       -       -       smtpd
  -o smtpd_tls_wrappermode=yes
  -o content_filter=smtp-amavis:[127.0.0.1]:10028
  -o smtpd_sasl_auth_enable=yes
  -o smtpd_client_restrictions=permit_sasl_authenticated,reject
#  -o milter_macro_daemon_name=ORIGINATING
Then reload Postfix:
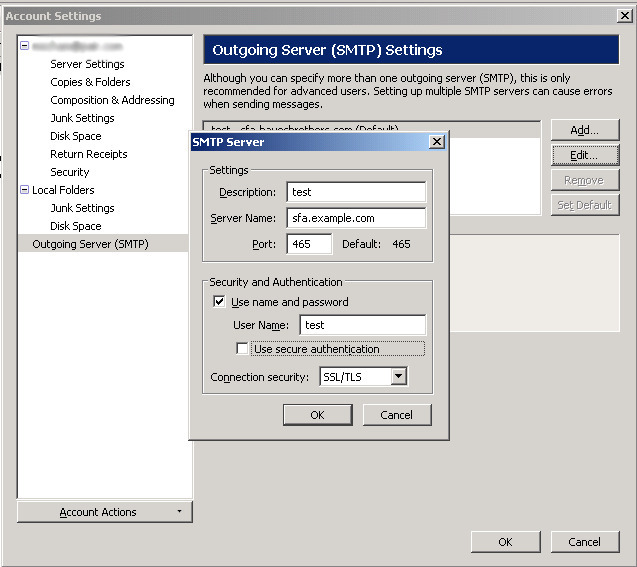
Configure your mail client to use SSL/TLS. Here is an example using Outlook Express where I
checked the box "This server requires a secure connection (SSL)"
In Thunderbird, you would not check "Use Secure Authentication", but would choose
"Connection Security". For port 465 (smtps) you would use "SSL/TLS" and for port 587 (submission)
you would use "STARTTLS":
You should now attempt to send another message through the spamfilter. To help troubleshoot
if needed, you can increase the number of TLS related messages that show up in /var/log/mail.log.
You can set smtpd_tls_loglevel between 0 and 4, but level 1 or 2 should suffice if you are having issues:
postconf -e 'smtpd_tls_loglevel = 1'

postfix reload


tail -f /var/log/mail.log | egrep '(sasl|SASL|TLS|SSL)'
|
When finished debugging, return to suppressing most TLS log messages:
postconf -e 'smtpd_tls_loglevel = 0'

postfix reload
|
If you go through this process more than once while testing, don't install duplicate certificates.
Delete any old 'test' certificate you previously installed before adding your new one that replaces it.
Keep in mind that you will need to create a Unix account and password for each person that you want
to allow to use SASL/TLS. Each person will also need to add the certificate to their PC and reconfigure
their mail client to send outgoing mail through the spamfilter on either port 465 (using SSL/TLS wrapper mode)
or port 587 (using STARTTLS).
Postfix as a SASL client.
Here we have a situation where you have an account with your ISP and they will allow you
to send mail out through their servers provided you authenticate with the server.
They may also expect you to connect through
port 465, 587 or some other port. You will be using them as your relayhost (smart host).
See: http://www.postfix.org/SASL_README.html#client_sasl
Note that it's quite possible that your ISP may place a limit on how many messages per day they will
allow you to send through their system. First install a necessary software component:
apt-get install libsasl2-modules
|
You begin the configuration by creating a file that contains the server you want to connect to, the
port you want to connect to and the username/password of your account. I have an account with Comcast.
They allow authenticated connections to port 587 on the SMTP server named smtp.comcast.net.
Therefore, I set up my file in this manner (don't make guesses on your user name or password,
you can stop mail flow if this gets messed up):
vi /etc/postfix/sasl_passwd
|
and add entries similar to:
[smtp.comcast.net]:587 username:password
You must postmap the file after making any changes:
postmap /etc/postfix/sasl_passwd
|
You should make a backup of main.cf because if things do not work out, you could have a lot of stuck mail:
cp /etc/postfix/main.cf /etc/postfix/main.cf-before-sasl-client
|
Now I tell Postfix to relay mail through Comcast using my account. Note that the format of relayhost
must be exactly the same as in /etc/postfix/sasl_passwd:
postconf -e "relayhost = [smtp.comcast.net]:587"

postconf -e "smtp_sasl_auth_enable = yes"

postconf -e "smtp_sasl_password_maps = hash:/etc/postfix/sasl_passwd"

postconf -e "smtp_sasl_security_options = noanonymous"

postconf -e "smtp_sasl_type = cyrus"

postfix reload

tail -f /var/log/mail.log
|
Send a test message to your Gmail/Yahoo/Hotmail account (or some other domain you do not host)
and watch for errors. If things crash, mail might start to pile up. I suggest restoring
the previous configuration and stopping and starting Postfix. You may have to requeue all
the stuck mail with "postsuper -r ALL".
Gary V
mr88talent at yahoo dot com
29 JUL 2010